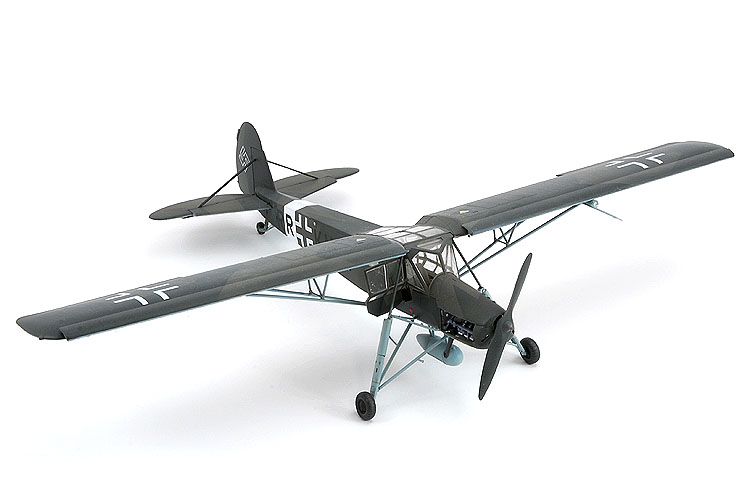
Although it`s ungainly, the Storch certainly gives the viewer lots to look at.
Kit:
Aftermarket:
Date:
Tamiya (61100)
None
2008
Every Air Force has one of those planes that just seemed to be so useful that it appeared everywhere. For the Luftwaffe this plane surely has to be the Fieseler Storch. Nowhere
as sleek as a Messerschmitt or as deadly as a Focke Wulf, the ungainly Storch was a valuable observation platform that participated in every major German offensive - from the
march across Europe and North Africa to the steps of Western Russia.
In 1935 the Reichsluftfahrtministerium (German aviation ministry) issued a tender for a new liaison, army-cooperation and medical evacuation airplane. Fieseler’s design was the
most advanced STOL aircraft offered and it had the advantage of using a conventional design. Focke Wulf by comparison offered a first-generation helicopter. The wings features
slotted flaps, leading edge slats and drooping ailerons. The landing gear, an intricate connection of tubes, had 18 inches of oleo compression, and while in flight, hung down,
giving the plane the appearance of a long-legged bird, and hence the name Storch (stork).
The Storch’s performance was nothing short of amazing. It was the closest thing to a helicopter in fixed wing aviation (and remained as such until the Harrier debuted in the
1960s). In a light wind, the airplane could take off in one or two fuselage lengths, hover in mid-air, even fly backwards. It became common practice for Storch pilots giving
Generals a tour of the battlefield to land in locations so small or obstructed that it was impossible to take off again. With the help of a truck or strong animal, the Storch,
with its wings folded, would be towed down the road until a suitable site could be found.
Storches will forever be linked to some of the most famous Axis personalities during the Second World War. Field Marshall Erwin Rommel used a Storch to observe his army’s
movements in North Africa. When Hitler ordered a daring rescue of deposed Italian dictator Benito Mussolini from atop Monte Cassino, it was an overloaded Storch that plucked him
from the rock strewn landing field. In the last days of Nazi Germany the famous female test pilot Hanna Reitsch flew her lover, Field Marshall Robert Ritter von Greim, to Berlin
where he took over command of the Luftwaffe from Hermann Goering.
The Storch was also the victim of the last dog fight on the Western Front. The fight was between a Storch and an American Piper L-4 Cub. Using only their service revolvers, the
Americans recorded not only the last kill of the war, but the only instance where an enemy plane was brought down by hand gun fire.
For years, those modellers (like myself) who prefer ungainly observation and training planes to sleek fighters have dreamed of a 1/48th scale Storch. ESCI released a kit in either
the late 1970s, or early 1980s but they commanded a king’s random whenever they appeared. In early 2008 Tamiya released their 100th model airplane kit – the Fieseler Storch. Many
modellers pondered Tamiya’s choice. Why not this? Why not that? Those of us who wanted one smiled quietly.
Molded in Tamiya’s standard medium grey plastic, the Storch lives up to everything we’ve come to associate with Tamiya – excellent details, superb engineering, and an amazing fit.
Being a special release the Storch also includes a fret of photo-etch, canopy masks, a couple figures and some diorama accessories from one of their 1/48th scale armour kits. This
last touch guarantees that Tamiya is aiming this model not at the airplane modeller, but at the same customers buying their 1/48th scale armour kits. This was proven when Rommel’s
half-track Greif was released – a perfect partner to sit beside your Rommel Storch.
Decals and optional parts are included for a ski-equipped example, an auxiliary drop tank, and both canopies for armed and unarmed planes. I don’t see any reason that you can’t
build any production-model Storch from the parts contained within the kit.
Because of the photo-etched parts, and the intricate nature of the interior and landing gear, I chose to closely follow Tamiya’s instructions.
The Storch is a tube and fabric airplane, and a lot of tubing can be seen inside the expanse of windows. Tamiya did a wonderful job recreating this in scale, but it also means
fragile parts and lots of mould line cleanup. In most cases, I used a #11 Exacto blade and left the parts on the sprues as long as possible.
Tamiya even gives the builder the choice of having the wing flaps posed up or down. Not a big deal you think? That means they include two sets of delicate flap hinges. I chose to
take advantage of Tamiya’s generosity and put my flaps down. These have to be installed before the wing halves are glued together, and afterwards, they become very fragile. I
carefully sanded the edges of the wings and set them aside on the shelf to avoid breakage. I also left off the flaps, ailerons and leading edge slats to ease painting, decaling
and weathering.
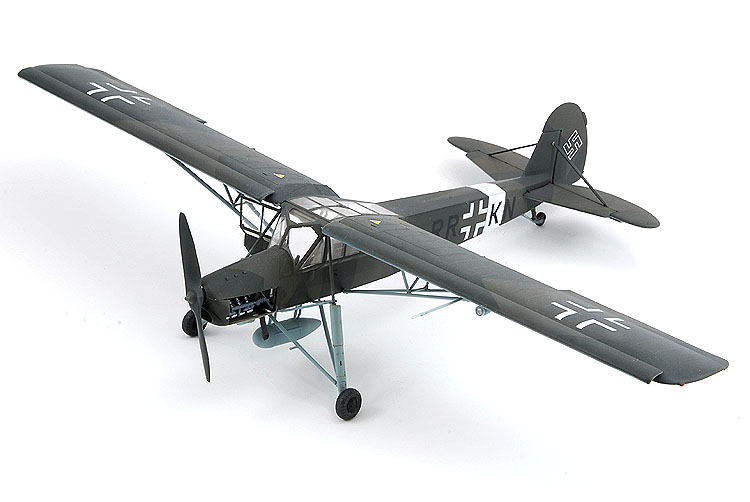
Even before I started on the interior, I had to make a number of choices. Most importantly, I had to choose which plane I was going to build. I liked the African camouflage and
the possibility of a heavily weathered winter white wash, but in the end I wanted to try my hand at a diorama, so I selected standard green-green splinter camouflage. I was then
able to go through the instructions and figure out which optional parts would be used.
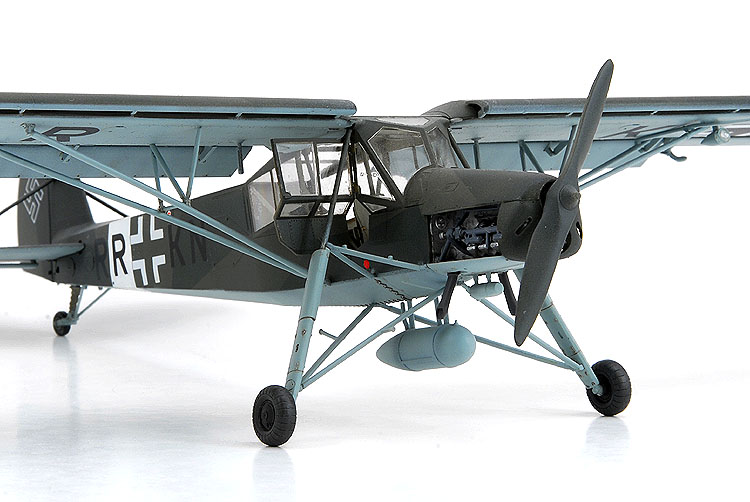
Tamiya loves making extremely intricate sub-assemblies and the Argus engine is no exception with 19 individual pieces, including one metal propeller shaft. Depending on the plane
you’re modeling, this will either go unseen beneath the cowling, or like in my case, become a focal point with the cowlings left off. This was done in the summer for extra cooling.
Most of the interior parts, including the photo-etch, were assembled and airbrushed RLM 02. Tamiya gives paint masks, but only enough for the exterior. I tried using them, but
found them too fragile. They’re much thinner than Tamiya masking tape and the edges tore as much as they cut. I switched back to my usual method of masking with Tamiya masking
tape. I sprayed most of the inner surfaces of the windows using Post-It Notes as my masking medium.
My first deviation from the instructions was super gluing the pilot’s seat onto the cabin floor. This made for a strong joint, but did introduce a challenge later. Tamiya would
have you leave the seat out, install some kind of cross piece in this area and then the wing spar. Only after this would you install the seat. Well, I didn’t and I had to cut
part of the cross piece off with an Exacto saw before I could wiggle the parts together being careful to avoid breaking my control stick. Same with the wing spar assembly.
Luckily the control column could be forced forward the tiny bit needed for clearance.
Even with my self-induced error, decaling the seatbelts and instrument panel, finishing assembling the cockpit, and gluing the fuselage halves together took about 90 minutes, and
I was watching a movie at the time. When I was finished, I was quite pleased with Tamiya’s attention to detail. Gunze’s Mr. Surfacer was used to dress the rear fuselage seam, and
to fill a small gap between the fuselage sides and belly. Careful sanding with sanding sticks parallel to the surfaces kept the corners true.
After I’d finished with the fuselage, I test fit the wings. These need a little help getting into their respective holes but once there they align themselves true. I fit the upper
greenhouse which uses little pegs to hold the wings tightly. Some force was needed to press everything together and once it was, the joint was almost perfect. Some might be
tempted not to glue it, but I’m not one of them. I said almost perfect, because there was a noticeable gap between the aft edge of the glass and the forward lip of the rear
fuselage. It’ll need putty, but because I was leaving the wings off for paint, and thereby the top glass, this would have to be addressed after painting. My solution was to use a
little Krystal Klear to fill the gap. A little spray with paint and the gap was gone.
I assembled the landing gear legs, cleaned up the horizontal stabilizers and cowlings but left them off for painting.
I wanted to try my hand at pre-shading, so I sprayed Polly Scale RLM Night Black over all the ribs, stringers and panel lines. The paint spit a lot as I was doing so, but it
levelled out before it dried. It looked like hell, but at least it was smooth.
The upper surfaces were airbrushed with RLM 71 Black Green and it quickly became apparent that all that pre-shading was for not. The slightly lighter RLM 70 Dark Green did show a
tiny bit of pre-shade, but only in the strongest of direct light.
The underside was a different story. The RLM 65 Light Blue really worked well with the pre-shading, and it wasn’t as difficult as I’d thought.
A coat of Future floor wax gave a glossy surface for the few decals, while a white fuselage band was applied with Polly Scale acrylics. The kit decals responded well to Gunze’s
Mr. Marksofter, but two of them - the fuselage crosses - silvered. I sprayed over those areas with green paint, and continued on my way. Polly Scale clear flat killed all of the
shine.
I didn’t go crazy weathering my model, choosing instead to limit myself to a light panel line wash with burnt umber artist’s acrylics, a little black chalk exhaust, and a couple
oil stains on the auxiliary fuel tank. I can always add more when I get around to making my diorama.
Despite all the struts, braces and landing gear legs, Tamiya did an amazing job engineering this kit and everything fits together super tight.