
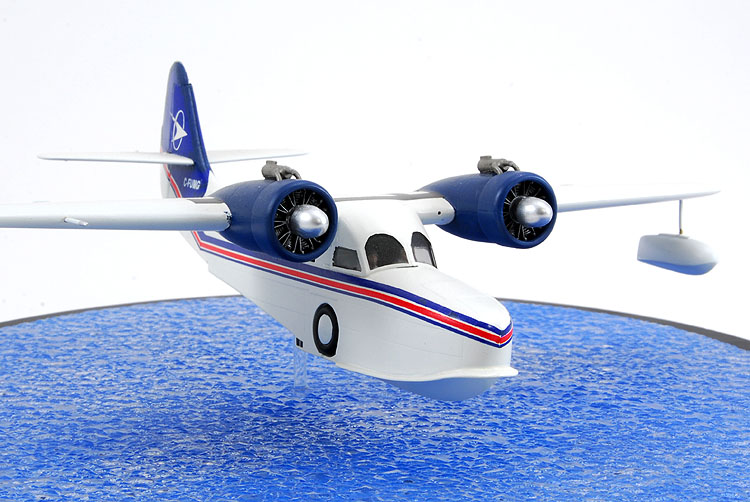
A couple simple modifications can turn a military Goose into a civilian bush plane.
Kit:
Aftermarket:
Date:
Sword (SW722011SE)
Draw Decals decals (72-Goose-6)
-
Immortalized in Jimmy Buffet’s first novel, “Where is Joe Merchant?” and in the 1982-1983 television series “Tales of the Golden Monkey” the Goose is probably the most famous, and
recognized of all of Grumman’s amphibious planes.
Although history books would have us think that all of North America spent the Great Depression riding from town to town searching for work, eating out of soup lines, and fighting to
survive, they fail to mention that many of those who had money, kept it. Many of the richest of the richest Americans were in the North-eastern States. Grumman Aircraft Engineering
Corp. was in a perfect position to benefit. The G-21 was designed as an airliner to fly these rich business men from their (and Grumman’s) home on Long Island to the financial
district of New York City, it would now be called a corporate, or business plane.
Debuting in 1937, the G-21 featured many typical Grumman traits; extremely rugged, all metal construction, and a narrow, manually retractable landing gear that also appeared in their
FF-1 biplane and F4F Wildcats. Its deep hull/fuselage was ideally suited to accommodate 10 passengers, or a bulky load of freight. Configured as a flying yacht, it usually seated two
or three, a bar and small toilet.
In 1938, the US military started showing interest. Although the Navy did buy quite a few (JRF), it was the Army Air Force that placed the first orders (OA-9). The US Coast Guard, RAF
and RCAF followed with orders of their own. It was the RAF who, following their standard, assigned it the name Goose.
Although only 345 Goose were produced, their non-combat role, and original civilian design made them ideal planes for many post-war airlines. Through the years, several modifications
have been offered, the most popular being retractable wingtip floats. A turbo-prop conversion was also offered.
In Canada, Gooses served as corporate transports, bush planes and commuter airliners, mostly in Ontario and BC.
Considering the Goose’s popularity, both as a civilian and military subject, its lack of guns and bombs and camouflage has kept steer major model manufacturers away, and back to
their Mustangs and Messerschmitts. It wasn’t until 2002 that Sword, a Czechoslovakian company released a kit that actually did this plane justice. Two other 1/48 scale kits have
appeared and now satisfy those modellers.
Injection moulded in a medium grey plastic, the parts have nice recessed panel lines. The canopy is a two-piece affair, while the interior, engines and exhaust are cast in grey resin.
Some flash is present on the smaller plastic parts, and I wonder how durable the landing gear legs will be.
In my boxing, there were markings for a US Coast Guard machine. I recall one other boxing was released.
I first had to decide what Goose I wanted to build. Not because there’s a lot of subtypes, but because each civilian Goose has undergone different modifications over its lifetime. My
mind was settled when I found a set of decals from Drawdecal, for a West Coast airliner.
I decided to leave the rear cabin out of my model, since it would be impossible to see anything through those tiny windows. I still needed the floorboard though. It didn’t take long
to glue the fuselage and wings together, this was after all an ‘almost’ out of the box build. The seats and instrument panel was installed, as were two pilots found in my bucket of
figures.
The plane I was building features the two most common modifications; the wingtip floats and three blade propellers. To make the floats, I took the kit pieces, attached a strip of
styrene plastic (the original has an attach brace), and a small length of brass wire. With the help of a Dremel motor tool, I cut a slot into the lower half of the wings, and the
tips were removed and shaped. Photos on aircraftresourcecenter.com provided references for these, and if you really want to get anal, I should actually have squared off the trailing
edge of the wing.
Although the model went together nicely, I still needed a touch of putty. The seams needed some Gunze Mr. Surfacer, and the seams for the cockpit window, underside of the wing, tails
and spray rail needed some Bondo.
After all that construction, I only needed to repair the panel lines on the top of the fuselage - a pretty good sign, considering the limited production nature of this kit, and my
ham-fisted approach to model building.
My plan was to build this model on a base, specifically skimming across the water, on the step, just as it would look taking off, or landing. This solved several issues I wanted to
avoid. The wheels would be up, so good-bye fiddly Grumman roller skate landing gear, and all I’d need for the three-blade propellers would be new spinners. Matching spinners from
Academy’s T-6 Texans were found, their openings filled with plastic and superglue, polished and painted with chrome silver. A small hole was drilled into the spinner and into the
engines and a length of brass wire inserted..
I once asked a local modeller how he gets such nice white finishes. He told me that he starts with a base coat of Tamiya’s white surface primer. Armed with this little secret, I
sprayed several thin coats, eventually building it up until it was opaque. I followed with Model Master’s Flat White enamel. Future floor wax gave it a shine in preparation for
decals.
As I mentioned before, I used a set from Drawdecals, which included an option for two Gooses serving with Trans Provincial Airlines in BC. These weren’t the first set of ALPs printed
decals I’ve used, but for the first time, I had problems.
The fuselage stripe is one long decal that would normally have be okay, but add the horizontal stabilizer running through the middle, and it was a real challenge. I ended up cutting
the decal into three pieces – the main stripe, the lower tail, and the upper tail. None of them fit without a fight. The main stripe wouldn’t bend around the curved forward fuselage.
I solved this by cutting dozens of slits into the decal, flooding it with Gunze’s Mr. Marksofter, and lots of finger pressure to force the decal to stick. Every time I touched the
decal, I expected the stripe to rip apart. The lower half of the tail worked okay, but I had to do something similar with the leading edge. I tried to repeat my success with the
upper tail, but in the end, the decal looked like crap. I sanded the decal to smooth the transition to the tail before moving to the other side. This time, I trimmed the edges off
the upper tail, and applied the decal. The blank spaces were then touched up with a carefully application of blue paint.
Speaking of blue paint, I used Polly Scale’s Israeli Camo Blue acrylic, applied with a paint brush.
More Future sealed the decals, made everything a little shinier. A subtle wash of dark grey was applied to the edges of the flight controls.
See this story to read about building this diorama.
What can I say? I really like my Goose. It’s a favourite airplane, its colourful, and its mine. It’s also something most modellers won’t build. The Sword model isn’t perfect. It
needs a touch of putty here and there, and the landing gear has me wondering, but it is a Goose, and it didn’t present any challenges.
The Drawdecals however, were quiet a challenge. Although they eventually responded to Mr. Marksofter, I have no doubt they were designed to fit a 2-dimensional drawing, rather than
the model’s compound curves.
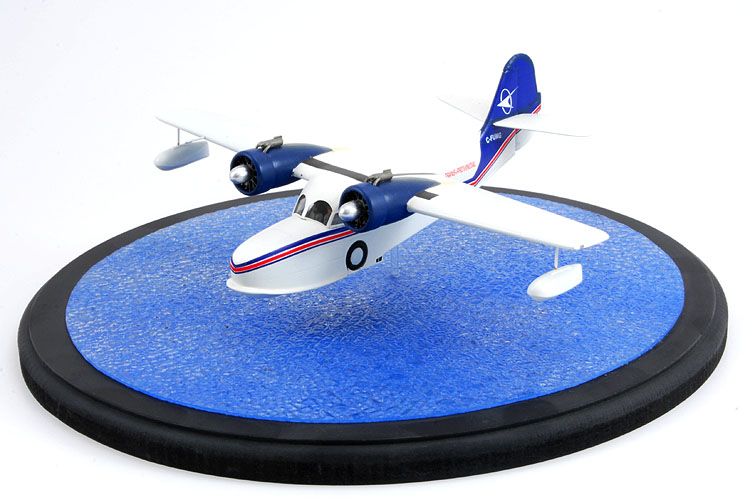
The base is simple, but it conveys the message that this is a seaplane.