
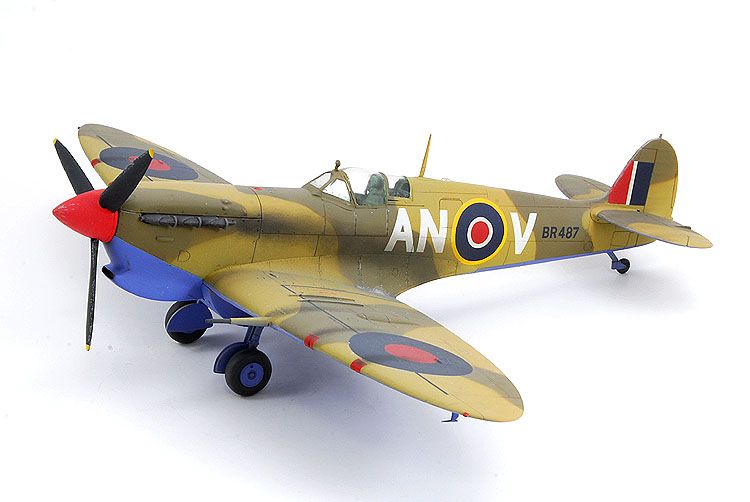
Although I didn't do anything special during construction, I was quite pleased to have accomplished my goal of replicating faded paint.
Kit:
Aftermarket:
Date:
Tamiya
None
2004
First, this release was the Spitfire Mk. Vc Trop and it was moulded in a light brown plastic. Another release of the Mk. V has been released (I believe it was actually released
before the Trop) and it was done in Tamiya’s familiar medium grey plastic. Construction for both kits will be the same.
Like all of the newer kits form Tamiya the Spitfire features fine, recessed panel lines and parts that fit so well together that glue almost isn’t needed. As I assembled the major
airframe components I only needed a touch of Gunze’s liquid putty, Mr. Surfacer 1000 along the seams. I did need a touch of Squadron’s white putty on the joint between the lower
wing and the lower fuselage.
Tamiya’s interior on the Spitfires is much like their P-51s, ample, but not overly detailed. In my case, this wasn’t an issue and I built the interior out of the box and painted it
following the instructions. Unlike the instructions, I slid the cockpit into place through the opening in the bottom of the fuselage. By doing this I ensured that I was able to glue
the cockpit into place in a straight, vertical position.
Painting this model was reasonably simple, and I’m starting to like camouflaging my Spitfires. First I airbrushed the undersides with Polly Scale acrylic’s Azure Blue. I then masked
the edges with Tamiya masking tape (since they’re hard-edged), then airbrushed the whole topside with Model Master’s British Mid-Stone brown enamel. I had to switch paint brands
because I couldn’t find mid-stone in a Polly Scale bottle. I then used paper masks (see my article) and airbrushed the regular RAF Dark Earth brown, returning to my trusted Polly
Scale acrylics.
Tamiya’s decals on this kit were a real shocker. I’d bought this kit from a fellow RMMC member and it must have been very old, because both sheets of decals were cracked. The white
sheet was totally unusable, while I had to apply a coat of Microscale’s Liquid Decal Film to the rest of the markings. Another club member came to the rescue with replacements.
When I started to apply the decals, I again used my trusted Gunze Mr. Marksofter as a setting solution, only to burn the roundels on the lower wings. Damn. That made me mad. With
some more care, I was able to apply the rest of the decals without burning them, or letting them silver. I discovered that when it comes to Tamiya decals patience is the key. I also
repeated my typical Spitfire mistake – I forgot the black walkway stripes on the wings. Normally I apply my national markings and roundels first, and that’s what I did this time
(and the two Spitfires before); at the end, realized that I needed to place the four stripes over the roundel. The shorter stripes weren’t an issue, but I had to cut the longer pair
around the roundel. Luckily a sharp knife and some care was all I needed to fix my oversight. I’m warning you so you can avoid this too. I applied another coat of Future, then a
coat of Polly Scale's clear flat. To give my model the appearance of a faded, sun bleached fighter, I added some Light Ghost Grey paint to an airbrush cap of clear flat and sprayed
the upper surfaces. This dulled not only the paint but all the decals as well. Some paint chipping was done using a combination of dry-brushing and silver pencil crayon. Some chalk
pastel was brushed onto the areas behind the machine guns, cannons, shell ejectors and the exhaust. I think I overdid the exhausts, so I used some tamiya tape to pull some excess
off before I used some light brown chalk to tone the black stains down. It was a case of getting too excited as I came to the end of another project.
Overall I enjoyed building another Tamiya Spitfire. It wasn’t complicated, nor did it means stressful construction, alignment and filling issues.
