
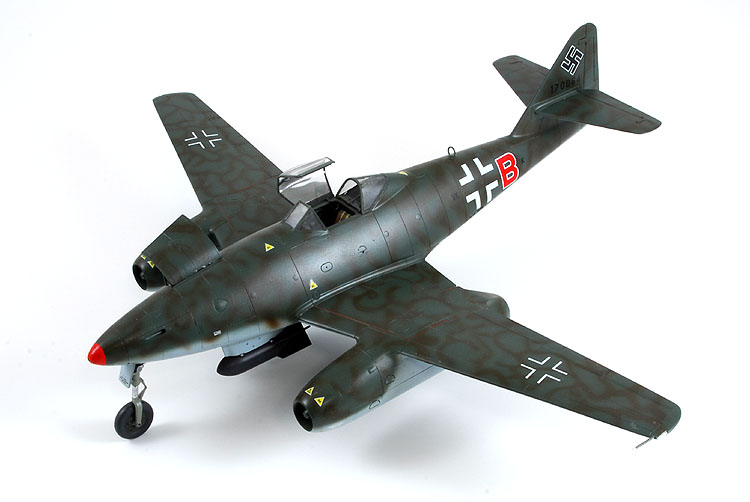
I have always thought the Me 262 was an attractive airplane, especially when it's all closed up and looking sleek. Which begs the question, "Why did I break those lines by opening up the cockpit and gun compartment?"
Kit:
Aftermarket:
Date:
Tamiya (61082)
None
2006
Overall this kit says “quality.” Upon opening the sturdy box one is greeted by numerous trees of medium grey sprue, individually wrapped in clear plastic bags, preventing damage.
Every piece is nicely moulded with crisp details and easy assembly. A prime example of Tamiya’s engineering was the metal nose weight, moulded to create the wheel well for the
forward landing gear. This was something I first saw in Eduard’s P-39 two years ago and it’s nice to see manufacturers take this into account when making new kits.
As I began assembly I noticed the level of detail to the interior components. I’ve built numerous Tamiya kits (Lancaster, P-51D, Wildcat, Mosquito, Spitfire) and I’m pleased to see
that Tamiya has included a very detailed cockpit, more attune with the Mosquito than the P-51.
The cockpit and forward fuselage interior were built as separate assemblies, just like the instructions suggest. When the major components were glued and dried, I brushed the nose
compartment with Testor’s Chrome Silver while the cockpit was done with Polly Scale acrylic’s Grimy Black (a railroad colour). Although the instructions are well drawn and easy to
follow, they continue to only call out Tamiya’s paint codes. I don’t know about you, but I have no idea what XF-54 is, nor do I enjoy mixing paints to create a colour I can buy from
another manufacturer. Details were brought out using a combination of thin washes and dry brushing before I applied the kit’s instrument panel decal.
When those two assemblies were finished, I super glued them into position against a fuselage half. Then the fuselage halves were joined using liquid glue. Here’s where Tamiya’s
quality shows through. Because of the fabulous fit between components I didn’t need to apply excess glue or liquid putty, only a light sanding to remove what little ridge may have
formed. Likewise the wings were given the same treatment.
The wings if you pay any attention to the Internet newsgroups caused quite a stir. “Why no slats?” asked some, “Why no flaps?” asked others. The answer is simple – because Tamiya
didn’t put them there. In my opinion, I don’t care. Although the Me 262’s slats were always open on the ground (because of the mechanism) I don’t mind not having them deployed.
Likewise with the flaps, they’re just easier to break.
Before proceeding further I test fit the wing, tails and engine subassemblies. I wanted to leave as much of this model apart until it had been painted. This would help me to mask
items. It would also make the customary German squiggles easier to paint, especially on the engines and vertical stabilizer, where I might accidentally mess up the underside colour.
I applied the topside camouflage of RLM 74 and 75 first, using and airbrush and masks cut from paper. The squiggles on the upper surfaces were hand painted using a fine brush, which
I traced over a pattern I created using a pencil. During the war these squiggles were applied per the personal tastes of the painters (and paint availability) so I wasn’t concerned
with creating a perfect representation, rather a general feel for the aircraft’s look. I should note that because the squiggles on the engine nacelles move onto part of the wing, I
super glued them into place before painting the thin lines.
When the paint was dry and I was happy with the look, I used super glue to attach the remaining parts together, remembering to be careful of excess glue (and fingerprints).
Since I don’t have a massive stock of aftermarket decals for this subject (or anything German for that matter) I used the kit-supplied decals. With the help of Gunze’s Mr.
Marksofter they settled down into the details with little or no prodding.
I weathered certain items with a light wash of acrylic brown and black paints (dipped in water and dish soap) and some ground chalk pastels. I decided to try and go for a muddy
look, and lightly airbrushed some earth tone acrylics over the underside of the inner wing, inner engine nacelles and rear fuselage.
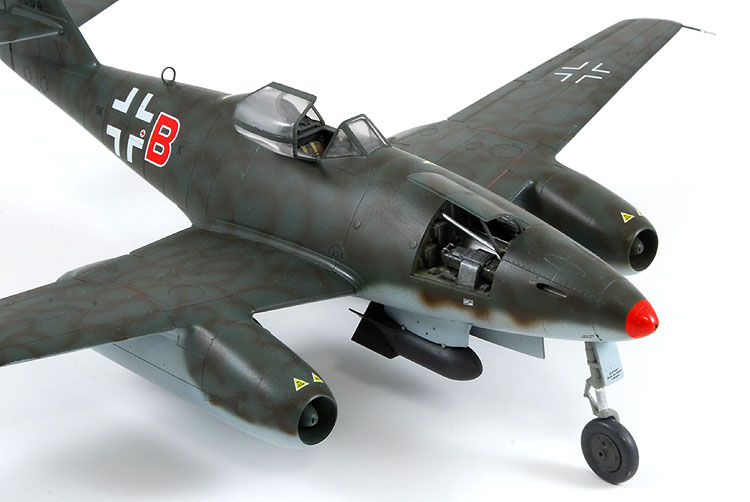
For reasons unexplained, I chose to expose half the gun compartment on the side away from the open cockpit.