
It looks like a Tutor, but that's about the biggest compliment anyone interested in accuracy can pay Hobbycraft's kit.
Kit:
Aftermarket:
Date:
Hobbycraft
None
2008
What happens when you join you’re buddies for an evening of model building and forget to bring a kit along? Luckily for me we were spending our evening in the local hobby shop so
the answer was to visit the sales shelves and select my next project.
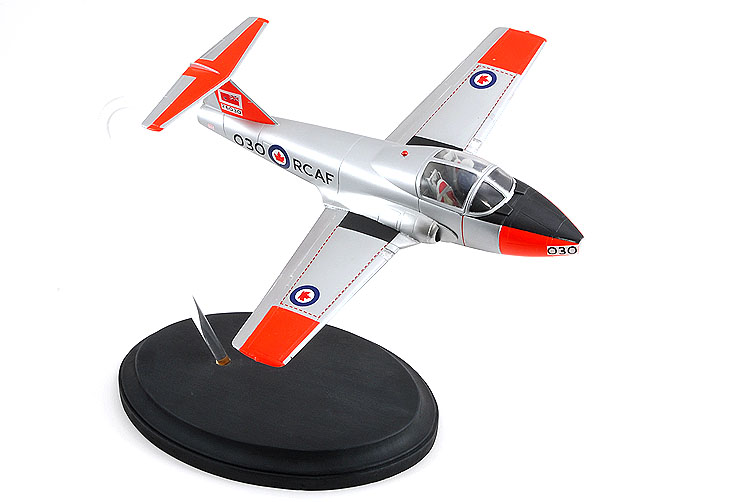
My choice was Hobbycraft’s CT-114 Tutor trainer – a kit which has met with lack luster enthusiasm from the modeling community. More on that later.
Famous for being the mount of Canada’s Snowbirds aerobatic demonstration team, the Tutor was designed to Royal Canadian Air Force specifications as a replacement for the legendary
T-33. As the RCAF’s basic jet trainer the Tutor included side-by-side ejection seats and a pressurized, air conditioned cockpit. Between 1963 and 1967 Canadair delivered 190 Tutors.
Having served Canada for more than four decades its no surprise that modelers were interested in finally having an injection moulded Tutor to add to their collections. Admittedly
Hobbycraft fell short in both accuracy and detail. The whole jet looks like a Tutor – just don’t look too close. The rear fuselage looks much fatter and rounder than the rear jet.
The wing’s trailing edges are nice and thin but this is accomplished by having the flight controls moulded solid. This results in a big gap on top of the wings and sink marks on the
ailerons and flaps. Matchbox’s mad-trencher has certainly made an appearance on this kit, which is surprising when one sees Hobbycraft’s redone Avro Arrow. Compared to Mike
Belcher’s resin/multi-media Tutor kit from several years ago Hobbycraft is certainly a distant second, although this model will look like a Tutor and only costs a quarter of the
Belcher kit.
Before construction began I chose to build my Tutor as an original RCAF training machine – overall natural metal with day-glo orange panels.
I started by cutting off the strakes installed on the forward fuselage. These were added after several years in service. All I needed were a couple passes with a sharp knife, I then
glued the sidewalls into place and test fit the cockpit. The interior is certainly bare-bones and I’ve heard that a resin set might be forthcoming, but I decided that with the
canopy closed and a pilot figure in place the details would be enough for my tastes. Details on the instrument panel and ejection seats were painted with a brush using Polly Scale
acrylics. The pilot figure came from (I believe) a Monogram F-101 Voodoo and needed his toes cut off.
The fuselage halves fit together alright. I needed a touch of liquid putty to dress some small gaps, but the worst was the trench lines that needed replacing. I tried a scribing
tool, but this was too narrow. I solved the problem recreating the trenches by dragging an Exacto saw over the lines to fatten them up. Since my jet was going to be flying I didn’t
use any nose weight, but it’ll certainly need it if you chose to have your model resting on its landing gear.
As I mentioned above the wing has a horrible gap between the wing and the flight controls. I ended up filling it with super glue and liquid putty before scribing new lines.
Several gaps appeared when I fit the wing to the fuselage. Once again I needed some putty to fill these. I think the worst area was in the area directly below the cockpit as I
needed a fair amount of putty to fill in a depression. I also filled in the two locator holes used by the auxiliary drop tanks on the belly since I wasn’t going to install these.
The horizontal tail also needed a small touch of putty to fill the gaps between tails.
I started my final colours by airbrushing the nose, tails and wing tips with Model Master’s Insignia White. I then applied thin coats of Fluorescent Orange to these areas and
allowed it to dry thoroughly. Once I was ready I masked off the orange panels, polished off the overspray with 1000-grit sandpaper and applied Tamiya’s grey, super fine surface
primer. According to one club member, that’s all he used beneath his Alclad II paint jobs.
Natural metal has always been the bane of modelers, but I’ve heard nothing but good from modelers using Alclad II. I started by applying a coat of aluminum, but it looked horrible.
My solution was to try Model Master’s Chrome. So much for a quick build – the paint was even worse than before.
Now I was left with having to polish the surface smooth again, fill in some seams that appeared to have shrunk and try again.
The anti-glare panel on the nose was masked and brushed with Polly Scale German Night Black.
Almost surprising, Hobbycraft’s decals have actually become quite useable. In fact, all of my markings are from the kit. One change was that I carefully reduced the amount of
carrier film on the wing’s walk area.
The final touch was to mount my Tutor on a length of Ľ inch clear acrylic rod (bent using heat from the stovetop) and plaque.
The kit cost me $20 and for that much I was much more accepting of the accuracy issues than I would have, had the model cost more. When viewed from a distance or by the untrained
eye Hobbycraft’s Tutor certainly looks like the famous trainer it’s supposed to.

The biggest problem with this model is that Hobbycraft have taken the boxy shape of the fuselage and rounded all the corners. This makes it look more like an overinflated balloon.