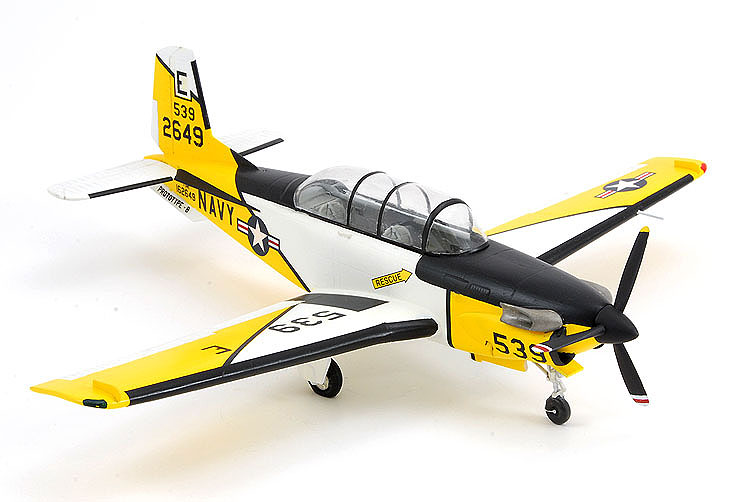
One of the attractions of this particular T-34C was the use of yellow instead of the standard International Orange. I later learned this is because the US Navy was evaluating both colours.
Kit:
Aftermarket:
Date:
Czech Master
Mike Grant custom decals
2008
As the worldĺs militaries began introducing jet aircraft, entire pilot training programs had to be revised. Nimble Stearmans couldnĺt convey the heavy controls, slow acceleration
and dramatic power curves typical in the first-generation jets.
For the US Navy and Air Force, North American designed the T-28 Trojan as an advanced trainer. Beechcraft won a similar contract to produce a primary trainer, the T-34 Mentor. Based
on Beechĺs popular Bonanza series, the T-34A was initially accepted by the USAF in 1953. Two years later, and the Navy accepted the T-34B. The biggest difference between these
piston models was an increase in wing dihedral, which increased stability.
In 1973, the US Navy began updating their training fleet, which introduced the T-34C. Dramatic improvements were made to the planeĺs performance, necessary because of the
performance increases seen in the larger fighters and attack jets. The piston engine was replaced by a turbine, the airframe was reinforced and a larger vertical stabilizer
installed. Strakes and ventral fins were added to improve some of the flying characteristics.
Between 1977 and 1990, more than 350 Turbo Mentors were produced, almost all for the US Navy.
As important as training airplanes are to every military and civilian group, they have been poorly represented in the scale model market. Bright colours and the mundane role of
training apparently doesnĺt compare to drab camouflage killing machines.
In 2002 I was shocked to see an announcement for a Turbo Mentor. Naturally I investigated, and after learning Czech Master was producing model kits on behalf of Squadron, I placed
an order.
When the kit arrived, I was pleased. Although the kit is simple, it has everything necessary to make a reasonable representation of the T-34, without major shape issues. The parts
are injection moulded in medium grey plastic, the cockpit and some of the exterior details are cast in beige resin, and two vacuformed canopies are included.
Marking were included in this boxing for two US Navy trainers in two of the standard white and orange schemes.
While I snapped this kit up in 2002, it wasnĺt until 2008 that I even separated parts from the sprue. After years of asking, I was finally sent to Seattle for a one-week training
session. Without a rental car, this meant most of my time would be spent in the hotel.
My model building pace dropped when I got engaged. By the time my daughter arrived, it was almost completely gone. When I received news of my impending trip, I took a lesson from my
brother and headed to the hobby room to select a traveling model project. Because of its small size, and relatively robust construction (no spindly landing gear or wing struts), I
grabbed my Turbo Mentor and an Academy Spitfire.
I wanted to save as much of the construction as I could for when Iĺd be cooped up in my room, so I only worked with what I couldnĺt do in Seattle. I took the cockpit tub to Scottĺs
hobby shop, where he removed the casting block for me using a belt sander. I also airbrushed the interior with Model Master flat Gull Grey. Details were picked out with a black
acrylic wash, and with that, I was able to leave my paints at home.
My travel tool kit contained:
- Super glue
- Tamiya liquid glue
- Gunze Mr. Surfacer
- Two single edge razorblades
- Razor saw
- Masking tape
- Dymo tape
- Fine, medium and coarse sanding sticks
- Ruler
- Tamiya scribing tool
It wasnĺt until I looked at the painting guide on the back of the instructions that something struck me as odd. The entire cockpit tub seemed too far aft. Looking closer, I figure
that the line Iĺd used as a guide was too far aft, but had I moved forward, there would have been a cavity behind the rear seat. Oh well. Should you build this kit learn from my
mistake.
Since I knew I would have to haul my model back home in my suitcase, I left off the separate vertical stabilizer, the landing gear and fiddly bits. The canopies were left at home so
they wouldnĺt get squished.
After returning home, I finished construction by installing the canopy, the landing gear and pitot tubes. The vertical fin was glued in place and the base dressed with a little
putty. Getting the canopy to fit was a real challenge. Iĺm not a fan of vacuformed parts, but I needed to carefully thin the aft edge with coarse sandpaper to get it to fit. This
wasnĺt enough, and I had to repeat the process on the rear fuselage as well.
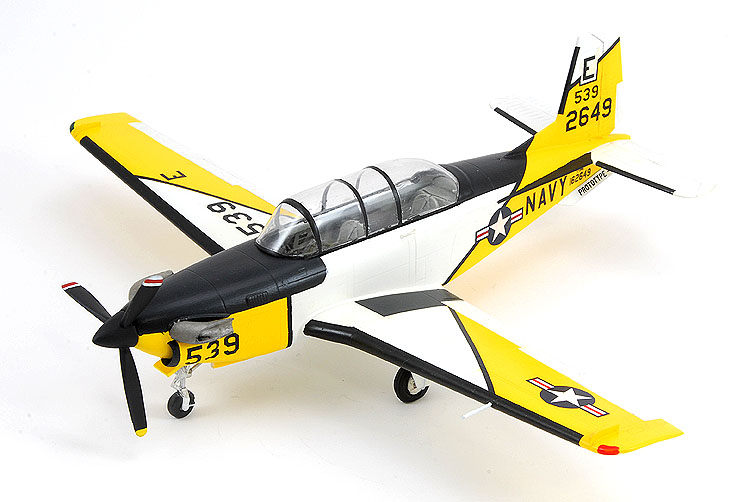
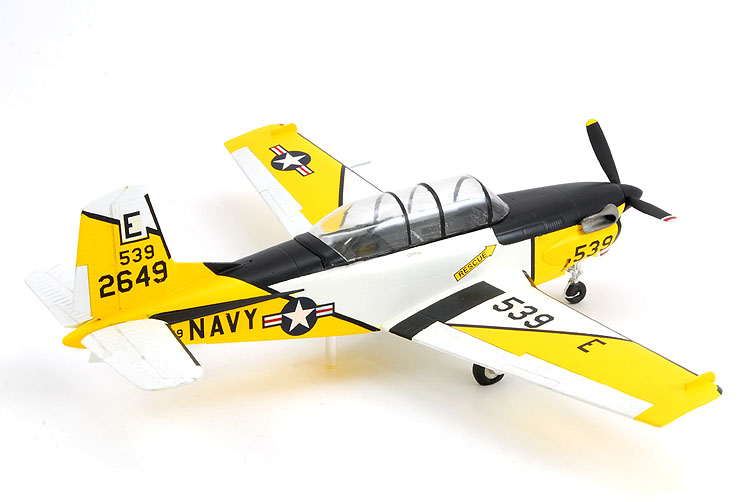
Ever since I saw the Squadron signal book T-34 In Action I wanted a specific, non-standard paint scheme. Apparently the US Navy was looking at changing the scheme, and the
experimented with different colours. This one was in the standard high visibility pattern, but used yellow instead of International Orange.
Several light coats of Tamiya white surface primer were applied to the model, followed by several thin coats of Model Master Insignia White. When it was good and dry, I masked off
the pattern and sprayed Tamiyaĺs acrylic bright yellow. It took several coats to make everything opaque.
Future floor wax gave everything a glossy shine.
A huge thank you, has to be given to our very own Mike Grant, because he took an email of dimensions and words and turned them into decals of all the words on this plane. They worked
flawlessly, but it wasnĺt easy getting them in place. The black stripes alone took 3.5 hours to do. Although I didnĺt ask for them, Mike gave me a second sheet of decals, and I used
the extra stripes to block in the border of the walkways. Rather than screwing up my model by trying to mask and paint these areas, all I had to do now was fill in the middle with
black paint and a brush. Nothing could be simpler.
Armed with only a basic toolkit my T-34C was simple enough to have (almost) ready for paint in about five or six hours. I also had movies playing as I worked, so I wasnĺt focused
100% on building.
Iĺm happy with how the model turned out. Yes, the cockpit is too far back, but I really donĺt see this as my fault. The instrument panels took a lot of effort to fit properly but in
the end, I won.
One thing I didnĺt do was fill the nose with lead, only because I wasnĺt about to give the airport security people any reason to check my luggage further. Instead, I added a small
clear acrylic rod under the rear fuselage. From a couple feet away, itĺs completely invisible.
The real joy this model represents was a brief return to my old style of model building; where Iĺd sit in front of the television, watch a show, and punch out model kits in hours,
rather than months.