The Royal Navy obtained the Grumman F4F Wildcat (renamed Martlet) from the United States and immediately deployed them on their escort carriers to close the mid-Atlantic air gap, a region where the U-Boat wolf packs prowled unchallenged.
Kit:
Aftermarket:
Date:
Tamiya
Eagle Strike decals (48016)
2004
In the early days of the Second World War the Allies were forced to make due with whatever equipment they had on hand. New equipment was scarce at best, and the farther from home
the troops were stationed the longer it took to get replacements. Ironically it would be in these God-forsaken locations that would see the most aggressive fighting.
In the Pacific theatre, fighters like the Brewster Buffalo, Curtiss P-40 and Grumman Wildcat were called upon to engage the faster, more nimble Japanese Zero. In the Atlantic,
German U-boats were going unchallenged as they sank hundreds of thousands of tons of shipping. Heavily guarded convoys were employed to maximize protection from surface escorts,
but small escort carriers were rushing into service to carry fighters and small bombers to patrol for, and attack enemy submarines.
Tamiya's Wildcat has been around for several years and its held up very well. It was one of Tamiya’s ‘new’ aircraft kits and, in my opinion, is still the best 1/48th scale
Wildcat, with none of the shape and accuracy issues that plague its successors.
Molded in Tamiya's typical medium grey plastic, all the parts were clean of flash and featured fine raised rivet details and nicely recessed panel lines. During test fitting, it
was determined that all the parts would fit together without the need for putty. This is not to say I didn't use putty – that’s just not my building style..
What's to be said about this kit? Typical of all Tamiya's recent releases, there's not surprise. Maybe that's the biggest compliment that can be offered. As long as you follow
the instructions there will be no trouble, no need for filler, and no cursing of misaligned parts. I assembled the fuselage and wings in two subassemblies before gluing everything
together. I left the rudder off to make it easier to mask the model during painting, but I should have also left off the horizontal stabilizer because it was a big pain in the
butt to work around with my masks. Other bits, like the engine, cowling, landing gear and drop tanks were also left off to ease painting.
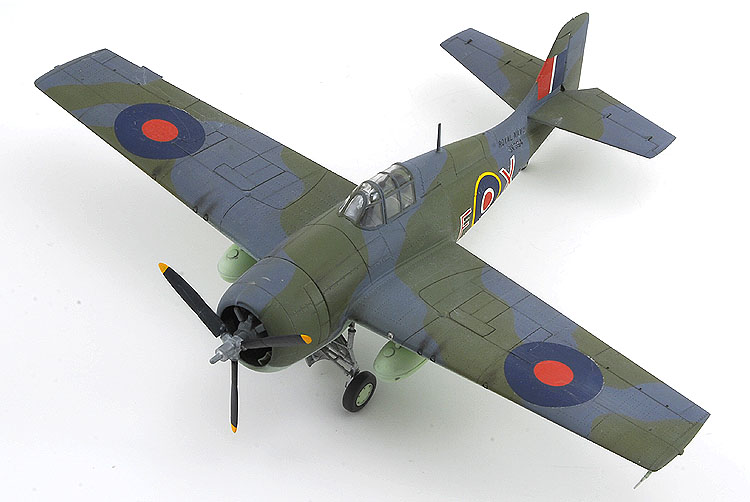
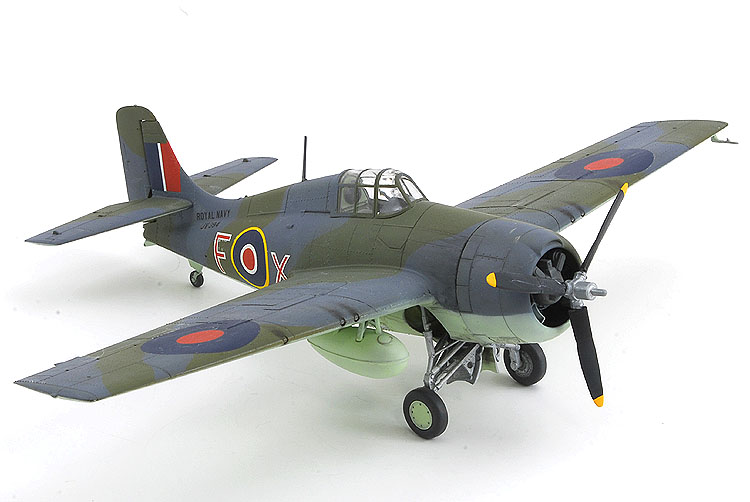
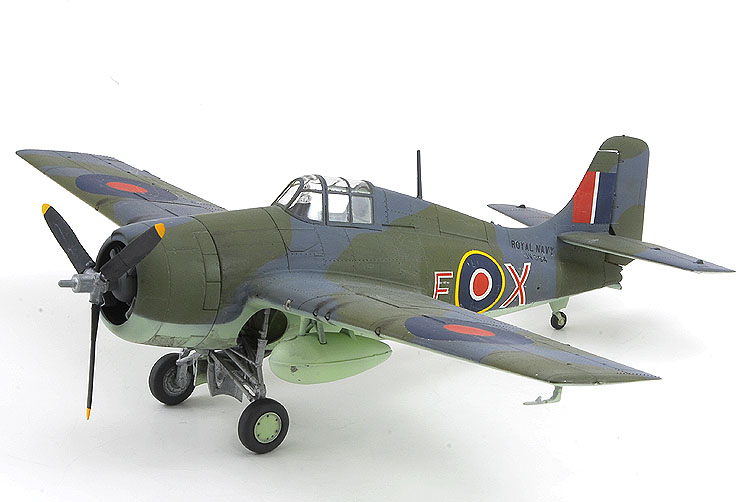
Yes I like the Wildcat. No I don't like their paint schemes. From the start, I was determined not to build another blue Wildcat so I initially set out to paint it in the Altantic
camouflage of white and grey. This sounded like a good plan, but my inability to spray a nice coat of white paint left me unhappy with the model. Just before I tossed my Wildcat
across the room, I found a sheet of Royal Navy Martlet decals from Eagle Strike. The best part was they were neither white nor blue. Faster than you can say yee-haw, money was
exchanged with the shop clerk and I was off to finish my model.
I started by painting the upper surface with Dark Sea Grey using my preferred Polly Scale acrylics. I then used paper masks to create a camouflage pattern in Dark Slate Grey.
Here's a note to all decal manufacturers - give us painting guides for both sides of the aircraft! I hate having to improvise camouflage patterns, and I hate it when the
side profile and the top profile don't match. Spend some time and do it right. More paper masks protected my work as I finished applying the underside Sky 'S'.
With everything painted and my touch ups complete, I applied a coat of Future floor wax to the entire model.
I applied the decals with the help of Gunze's Mr. Marksofter. Each one needed lots of setting solution, and some poking with a knife before they finally settled down into the
recesses. Even then, there was some silvering which I touched up with a fine paintbrush.
I applied a heavier coat of Polly Scale's Clear Flat so it would start to cloud. In my opinion this makes the paint looked faded and beaten by salt spray, a condition very
prevalent on an aircraft carrier. I then applied a wash to most of the panel lines and some oil stains to the engine cowling and fuselage undersides. Chalk pastel was used for
exhaust and gun stains before I again coated the model with Clear Flat. Finally I added chipped paint around the walkways using an almost dry paintbrush and some Testors Chrome
Silver. I did this last because I wanted the 'chipped paint' to retain some of its shine.
The Wildcat has everything we've come to expect from Tamiya; fine details and nearly perfect fit. With the exceptions of the six layers of failed camouflage paint (that's right –
six layers) that I didn't strip, this kit had no surprises, no problem spots, and nothing to interfere with its construction.